
WordPress is the world’s most popular Content Management System (CMS), running more than 43% of all websites on the internet. However, its widespread use makes it a common target for hackers.
Brute force attacks, file upload vulnerabilities, and cross-site scripting attacks all contribute to the ongoing threat.
Fortunately, there are multiple ways to make your website safer and less prone to attacks. And that’s where HTTP Headers come into the picture.
By implementing HTTP Security Headers, you can restrict the actions that browsers and servers can perform on your website and add an extra layer of security. These headers make it much harder for attackers to exploit client-side vulnerabilities.
In this article, we will discuss what HTTP security headers are and how you can implement them effectively on your website.
What Exactly are HTTP Security Headers?
HTTP Security Headers are a group of directives web applications use to implement security defenses in web browsers. These headers are exchanged between the web browser (the client) and the server to identify the security parameters of HTTP communication. This exchange of information tells the browser how to behave throughout its interactions with your site and governs processes such as displaying errors and managing the cache.
Of course, this additional security and efficiency is largely reliant on the browser. Older web browsers won’t have the same level of security or compatibility and may not process HTTP security headers correctly, fully, or even at all. Potentially, this can mean that, despite all your efforts to help the visitor stay secure, their out-of-date browser still leaves them vulnerable. As website developers, we should do all we can but accept that, at the visitor’s end, it’s their responsibility to make sure they’re using up-to-date software on their computer. As long as they’re using a modern, up-to-date web browser, then our use of HTTP security headers will work with their browser software to keep them safe.
Our primary concern, however, is that HTTP security headers prevent your website from common attacks such as cross-site scripting and brute force attacks. The most effective ways to implement these headers are to set them to your WordPress hosting account (server level) and use a DNS-level website application firewall such as Cloudflare.
But you need to remember that while adding HTTP security headers can help improve the security of your site, it’s just one aspect of website security – and should be used in conjunction with other security measures. This includes keeping your applications and plugins updated, encrypting your sensitive data, and backing up site data and configuration files.
Before discussing different methods to add security headers, let’s take a look at each header in detail and understand why it is important. If you are already familiar with security headers, you can skip ahead.
The Types of WordPress HTTP Security Headers
There are several HTTP security headers that can be used with your WordPress website to enhance protection. Let’s take a look at some of the most important ones.
1. X-Frame Options Security Header
The X-Frame-Options security header can be used to prevent different brute force attacks and DDOS attacks, but its most effective use on your WordPress website is against cross-jacking iframes and click-jacking. This header allows you to decide whether or not a page on your website can be embedded using iframe elements in the browser.
X-Frame Option protects your website from click theft by stopping iframes from filling with your site. It has two different directives which you can choose from – DENY, and SAMEORIGIN. It works with all popular web browsers, such as Chrome, Safari, Firefox, and Opera.
X-Frame-Options: DENY
X-Frame-Options: SAMEORIGIN
When specified with DENY, the X-Frame-Options header will cause a fail should any browser attempt to load the page within a frame when loaded from other sites. Attempts to do this will also fail when loaded into an iframe from the original site. On the other hand, if we specify SAMEORIGIN, we can still use the page within a frame – as long as the site including it in a frame is the same as the one serving the page.
This header is particularly important for web pages containing sensitive information and pages that embed information such as payment gateways and forms.
2. HTTP Strict Transport Security (HSTS) Header
The HTTP Strict-Transport-Security is a security response header sent from a web server to a user’s web browser to inform it that the site should only be accessed using HTTPS and never via unencrypted HTTP.
This header provides a mechanism to enforce the use of HTTPS by the browser, even if the user types “http://” in the address bar or follows an HTTP link. It can also prevent users from ignoring expired or invalid SSL/TLS certificates and other browser warnings. The HSTS value is set per browser that visits the website rather than per machine.
The HSTS header provides an option to include any sub-domains – you can use the “includeSubDomains” directive to adopt the same level of security from the root domain. This means that any local development with the domain (or sub-domains) will no longer be accessible through HTTP since the browser will only permit HTTPS traffic.
For example, if you have HSTS headers on example.com with the necessary “includeSubdomains” directive, then you won’t be able to access subdomains of example.com via unsecured connections once you have visited the example.com. Therefore, be careful if you choose to use “includeSubdomains”, as it might have implications on your other domains.
Once a browser receives an HSTS header from a site, it will remember the HSTS policy for the specified duration – and automatically upgrade all future requests to the site to HTTPS. This helps in the avoidance of man-in-the-middle attacks, eavesdropping, and other forms of tampering by ensuring that all communication between the browser and server is encrypted.
Understanding The Preload List for HSTS
The HSTS header only works only after the user visits your site at least once because the browser doesn’t know whether the site supports HSTS or not. This means that the browser might attempt to establish a connection over HTTP before it is redirected to HTTPS.
To solve this problem, the Chromium project maintains a list of domains that are known to support HSTS. This list is embedded into major browsers such as Chrome, Firefox, Safari, and Edge. When a browser encounters a domain on the preload list, it automatically uses HTTPS for all requests to that domain, even before contacting the web server. This eliminates the risk of attacks on the first request.
The preload list comes with significant responsibilities and risks for site owners. The preload directive should only be used by sites that are fully prepared and confident in their HTTPS implementation. There are a few requirements that your site must satisfy before you can add a domain to the preload list:
- Having a valid SSL certificate
- Redirecting all HTTP traffic to HTTPS
- Serving all subdomains over HTTPS
- Serving the HSTS header with the preload directive on all HTTPS responses
If your site meets all the above requirements, then you can change your site’s headers to include the preload directive in the HSTS header. The Chromium project recommends that you should gradually increase the max age for this header over a period of several months before submitting the request to be included in the list. For example:
Strict-Transport-Security: max-age=300;
includeSubDomains; preload
This tells the browser that the site wants to be preloaded and that all subdomains of the site also support HSTS. The max-age parameter specifies how long the browser should remember this information in seconds.
Preloading is a big commitment and should not be taken lightly. Once a domain is on the preload list, it is effectively hardcoded into the browser’s code and cannot be easily removed or reversed. This means that:
- The site must always support HTTPS and serve the HSTS header with the preload directive
- All subdomains of the site must also support HTTPS and serve the HSTS header with the preload directive
- Any non-HTTPS subdomains of the site will become inaccessible to users with browsers that have the preload list
Therefore, before adding a domain to the preload list, you should make sure that you are ready for this commitment and that you don’t want to use HTTP ever again. Otherwise, there may be serious consequences, such as losing traffic, breaking functionality, or compromising security.
If you are confident that you want to enable HSTS preload, then you can submit your domain to https://hstspreload.org/; It checks if the site meets the requirements for preloading and adds it to the submission queue. Once the domain is submitted and verified, it will be added to the preload list in a future update of the browsers. This process can take several months or longer, depending on the browser release cycle.
The syntax to add this header in WordPress is:
# Without preload and includeSubDomains directive
<IfModule mod_headers.c>

Header set Strict-Transport-Security: “max-age=63072000;”

</IfModule>

# With preload and includeSubDomains directive

<IfModule mod_headers.c>

Header set Strict-Transport-Security "max-age=31536000; includeSubDomains; preload"

</IfModule>
The max-age=<expire-time> directive designates the time (in seconds) the browser should remember that a site can only be accessed using HTTPS. For instance, in the above example, the max-age is set to two years. If you have chosen to have Servebolt CDN or Accelerated Domains from Servbolt, you will automatically have 1 year of HSTS length.
3. Referrer-Policy Header
This HTTP header controls how much referrer information sent via the referer header should be included with requests. It limits the amount of information that is sent when a site visitor clicks on a link. This helps to prevent the leakage of sensitive information to other websites, such as the URL of a page with private information.
It can have several values – here’s a quick rundown:
- no-referrer: The Referer header will never be sent under any circumstances.
- No-referrer-when-downgrade: The Referer header will not be sent when navigating from an HTTPS site to an HTTP site.
- Origin: The Referer header will only include the origin (scheme, host, and port) of the referring page.
- Origin-when-cross-origin: The Referer header will include the full URL of the referring page when navigating between pages within the same origin and only the origin when navigating to a different origin.
- Strict-origin: The Referer header will only include the origin of the referring page and will not be sent for cross-origin requests.
- Strict-origin-when-cross-origin: The Referer header will include the origin of the referring page and will not be sent for cross-origin requests except for same-site origins. We recommend using this setting as it retains the usefulness of the header while mitigating the risk of leaking data.
- Unsafe-url: The Referer header will send the origin, path, and query string when performing any request, regardless of security.
For an in-depth discussion on the referrer policy header, read Google web.dev’s article on best practices for referrer policy.
4. X-Content-Type-Options Header
The X-Content-Type-Options header is sent by the server in an HTTP response to indicate to browsers about MIME types. The purpose of this header is to prevent browsers from interpreting files as a different MIME type from the one specified in the header.
This header can have a single value of “nosniff.” The syntax is as follows:
X-Content-Type-Options: nosniff
It is very effective against MIME confusion attacks. Using this security header can prevent the browser from interpreting files in unexpected ways that might lead to security vulnerabilities. For example, if an attacker uploads a file with a .jpg extension but which contains no content because it is actually a script, setting the X-Content-Type-Options header to “nosniff” will not allow the browser to execute the script, thus protecting users from potential breaches.
5. Content Security Policy (CSP) Header
Content-Security-Policy is a security header used to specify the content’s origin and provides a mechanism for the content that is allowed to be loaded and executed in a website or a web application. By specifying a set of policies, this header can restrict the types of content that are allowed on a webpage and mitigate various types of security threats. It is an added layer of security against Cross-Site Scripting (XSS) and Data Injection attacks that are used for crimes such as data theft, site defacement, and malware distribution.
In addition to controlling the types of resources that can be loaded, the Content-Security-Policy header also provides a way to instruct the browser on how it should handle any violation of the policies specified in the header. For example, a policy might specify that if a resource violates the policy, the browser should publish a warning or block the resource from being loaded.
The server needs to be configured to return the Content-Security-Policy header for the policies to function. You can use the CSP HTTP header to specify your policy like this:
Content-Security-Policy: policy
This policy is a string containing the policy directives describing your Content Security Policy. For instance, you can add the following lines to your .htaccess file to implement CSP.
<IfModule mod_headers.c>

Header set Content-Security-Policy "default-src https: 'unsafe-eval' 'unsafe-inline' 'self'; object-src 'self'; font-src https: data: 'self' http: fonts.googleapis.com themes.googleusercontent.com; connect-src https: wss: 'self'; img-src https: data: 'self' http: *.gravatar.com; worker-src blob: https: 'self' 'unsafe-inline' 'unsafe-eval'; media-src https: blob: 'self'; style-src https: 'unsafe-eval' 'unsafe-inline' 'self' http: fonts.googleapis.com"

</IfModule>
If you are enforcing CSP on a WordPress website, you should note that ‘unsafe-inline’ and ‘unsafe-eval’ are needed by WordPress to work properly. The above configuration is a good starting point for most WordPress websites. However, there are risks associated with using the above configuration without a clear understanding of what each section means. Here is a breakdown of each directive:
- default-src – This directive sets the default policy for all types of resources unless they are overridden by other directives. In this case, it allows resources to be loaded from the same origin (‘self’), as well as from HTTPS sources and from scripts that use ‘unsafe-eval’ or ‘unsafe-inline’.
- object-src – This directive restricts the types of objects that can be embedded in a page, such as Flash or Java applets. Here, it allows objects to be loaded only from the same origin (‘self’).
- font-src – This directive restricts the sources from which fonts can be loaded. Here, it allows fonts to be loaded from HTTPS sources, the data URI scheme, and from the same origin (‘self’) or from HTTP sources from Google Fonts and Google User Content.
- connect-src – This directive restricts the sources that can be used for network requests, such as AJAX requests or WebSockets. Here, it allows connections to be made only over HTTPS or WebSockets and from the same origin (‘self’).
- img-src – This directive restricts the sources from which images can be loaded. Here, it allows images to be loaded from HTTPS sources, the data URI scheme, and from the same origin (‘self’) or from HTTP sources from Gravatar.
- worker-src – This directive restricts the sources from which web workers can be loaded. Here, it allows workers to be loaded only from the blob URI scheme, HTTPS sources, and from scripts that use ‘unsafe-eval’ or ‘unsafe-inline’.
- media-src – This directive restricts the sources from which media resources can be loaded, such as audio or video. Here, it allows media to be loaded only from HTTPS sources, the blob URI scheme, and from the same origin (‘self’).
- style-src – This directive restricts the sources from which stylesheets can be loaded. Here, it allows styles to be loaded from HTTPS sources and from scripts that use ‘unsafe-eval’ or ‘unsafe-inline’, as well as from the same origin (‘self’) and from HTTP sources from Google Fonts.
When using the CSP header with your WordPress instance, it is important to note that improperly applying the CSP headers will break the WordPress Admin Dashboard because certain plugins and services might rely on third-party JavaScript.
To fix this, you will need to manually add each security rule to your headers file. An alternative, but less secure, way is to disable the CSP header in your admin dashboard. For example, here is what we do on servebolt.com:
Header set X-Frame-Options SAMEORIGIN

Header set Referrer-Policy strict-origin-when-cross-origin

<If "%{REQUEST_URI} !~ /wp-admin/">

# only add header if not admin screen

Header always set Content-Security-Policy "default-src 'self' 'unsafe-inline'; script-src 'self' 'unsafe-inline' 'unsafe-eval' *.intercomcdn.com cdn.firstpromoter.com servebolt.containers.piwik.pro *.intercom.io cdn.getreplybox.com platform.twitter.com v0.wordpress.com cdn.jsdelivr.net servebolt.piwik.pro ; media-src 'self' *.intercomcdn.com data: ; img-src 'self' 'unsafe-inline' *.intercom.io *.intercomcdn.com *.intercomassets.com data: raskesider.raskesider.no *.servebolt.com secure.gravatar.com servebolt.piwik.pro ; connect-src 'self' ws: nexus-websocket-a.intercom.io *.piwik.pro servebolt.piwik.pro *.intercom.io ; font-src 'self' *.intercomcdn.com data: ; frame-src 'self' app.getreplybox.com platform.twitter.com player.vimeo.com wordpress.org www.youtube.com caniuse.bitsofco.de video.wordpress.com *.intercom.io; frame-ancestors 'self' *.servebolt.com;manifest-src 'self' ;"

</If>
While enforcing CSP on your site, you should note that it might break your development environment if you are not using HTTPS. If you are not sure how to generate a policy for your site, you should use a graphic tool such as ValidBot – CSP Wizard or Report URI: CSP generator.
6. Permissions-Policy Header
Permissions Policy provides mechanisms for developers to explicitly declare what functionality can and cannot be implemented on a website. It manages the set of permissions that the website requires. This header is used to restrict the capabilities of a website in order to prevent certain security and privacy risks, such as the abuse of Javascript APIs, tracking users, and the execution of infected code.
Permissions Policy allows a server to set whether a feature can be used in a particular document. It uses allowlists – a list of origins that takes specific predefined values. The Permission-Policy header’s value consists of a comma-separated list of directive names and their values describing the various permissions a website requires.
The general syntax for the Permissions-Policy header is:
Permissions-Policy: <directive>=<allowlist>
For instance, if we need to block all access to geolocation, we would do this:
Permissions-Policy: geolocation=()
Here, the symbol () signifies an empty allowlist. To allow access to a subset of origins, we would do this:
<IfModule mod_headers.c>

Header always set Permissions-Policy "geolocation=(self 'https://abc.example.com' 'https://pqr.example.com'), midi=(), sync-xhr=(), accelerometer=(), gyroscope=(), magnetometer=(), camera=(), microphone=(), fullscreen=(self)"

</IfModule>
Let’s take another example. The following header value restricts a website only to execute scripts if they are served from the same origin as the main document:
Permissions-Policy: script-src 'self'
The Permissions-Policy header can be used to replace or complement the traditional Content-Security-Policy header, which provides similar functionality but with a different syntax and less coverage in terms of permissions. This header is currently an experimental technology that is supported only in Google Chrome and other Chromium-based browsers. It provides a more powerful and flexible mechanism for controlling permissions, and its adoption is expected to grow in the future. If you want to try it out for yourself, you can use the Permission Policy Header Generator to generate permission policies easily.
7. X-XSS Protection Security Header (deprecated)
The X-XSS-Protection header was a browser feature that aimed to prevent cross-site scripting (XSS), a security vulnerability that allows unauthenticated third parties to execute code on behalf of another website in the browser.
The header can have one of these several values:
- X-XSS-Protection: 0 Disables XSS filtering
- X-XSS-Protection: 1 Enables XSS filtering, which is usually the default in most browsers. If an XSS attack is detected, the browser will remove the unsafe parts of the page (sanitizing).
- X-XSS-Protection: 1; mode=block Enables XSS filtering, but rather than sanitizing the page, the browser will prevent the rendering of the page.
- X-XSS-Protection: 1; report=<reporting-uri> Enables XSS filtering. The browser will sanitize the page and report the violation if a cross-site scripting attack is detected.
However, this header has been deprecated and superseded by the Content Security Policy (CSP) header, which provides a more robust and flexible way of controlling the sources and types of content that can be loaded and executed on a web page.
As is well-documented in Mozilla’s MDN web docs, the XSS-Protection header is ignored by modern browsers that support CSP. The browser support for this header is limited to older browsers – which accounted for less than 5% of active browsers as of December 2021.
Therefore, it is recommended to use CSP instead of X-XSS-Protection to prevent XSS attacks on web pages. The X-XSS-Protection header can be left in place for backward compatibility, but it should not be relied upon as the primary defense against XSS.
Adding HTTP Security Headers Using The .htaccess File
The way we recommend adding HTTP security headers is by editing the .htaccess file directly. This is a server configuration file most commonly used by Apache web servers. By editing this file, you are ensuring that the HTTP security headers in WordPress are configured at the server level.
You’ll need access to your website’s .htaccess file to use this method. It can be accessed on Apache servers using an FTP client. Before making any changes, it’s highly recommended that you make a backup of your current .htaccess file.
First, simply log in to your site using an FTP client or the file manager tool in your hosting control panel. In the root folder of your website, locate the .htaccess file and right-click on the ‘Edit’ option. This will open the file with a text editor. To add HTTPS security headers to your site, you can add the relevant code at the bottom of the .htaccess file.
The following sample code can be used as a starting point. It sets the most commonly used HTTP security headers with the recommended settings.
<IfModule mod_headers.c>

Header set Strict-Transport-Security "max-age=31536000; includeSubDomains; preload" env=HTTPS

Header set X-XSS-Protection "1; mode=block"

Header set X-Content-Type-Options "nosniff"

Header set X-Frame-Options DENY

Header set Referrer-Policy "no-referrer-when-downgrade"

Header set Content-Security-Policy "default-src https: 'unsafe-eval' 'unsafe-inline' 'self'; object-src 'self'; font-src https: data: 'self' http: fonts.googleapis.com themes.googleusercontent.com; connect-src https: wss: 'self'; img-src https: data: 'self' http: *.gravatar.com; worker-src blob: https: 'self' 'unsafe-inline' 'unsafe-eval'; media-src https: blob: 'self'; style-src https: 'unsafe-eval' 'unsafe-inline' 'self' http: fonts.googleapis.com"

Header always set Permissions-Policy "geolocation=(self 'https://abc.example.com' 'https://pqr.example.com'), midi=(), sync-xhr=(), accelerometer=(), gyroscope=(), magnetometer=(), camera=(), microphone=(), fullscreen=(self)"

</IfModule>
Once you add the above configuration to your .htaccess file, the relevant headers will be applied to all web requests.
You can verify whether the headers are being used by opening the “Network” tab in the Chrome DevTools and inspecting the response headers of your request.
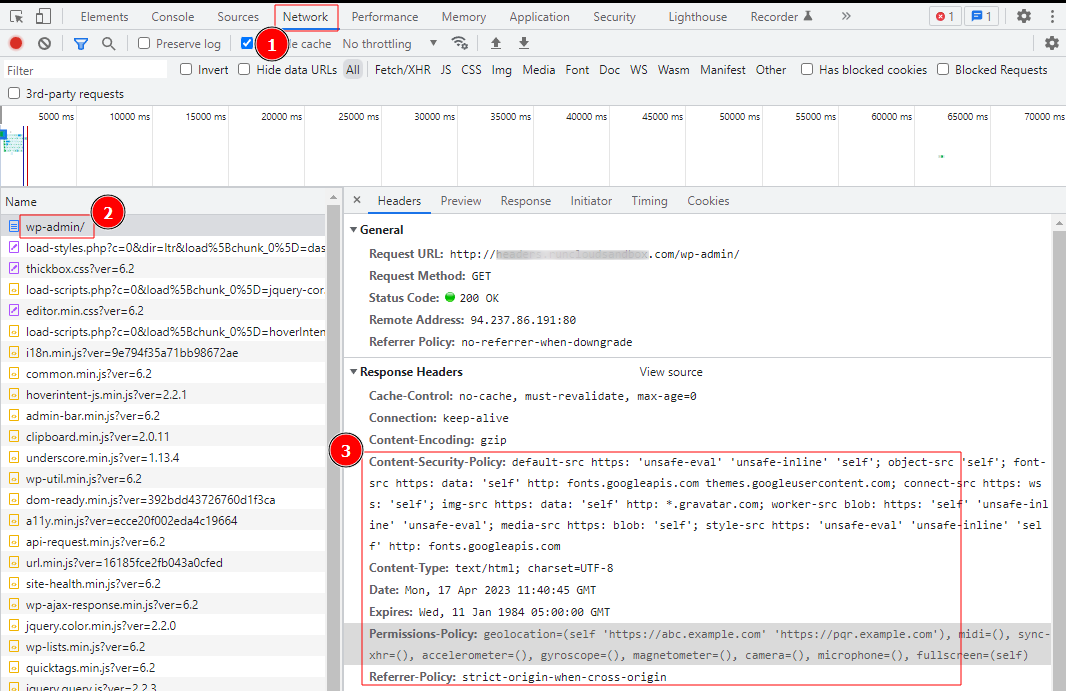
After adding the code, save your changes and revisit your website to ensure they’re working as expected. You must also be careful when editing your .htaccess file because incorrect code headers or typos, such as the 500 Internal Server Error, can trigger errors.
Adding HTTP Security Headers In WordPress Using a Content Distribution Network (CDN)
A Content Delivery Network (CDN) is a group of geographically distributed servers that provide cached internet content from a network location closest to a user to improve web performance. Popular CDNs such as Cloudflare also enable you to add HTTP headers to your website.
Let’s take Cloudflare as an example and see how we can add HTTP headers using a CDN. Cloudflare offers a rudimentary free website firewall along with the CDN service, but the more advanced security features are locked behind a paywall.
Setting up Cloudflare on your WordPress website is quite easy. You can sign up manually on Cloudflare’s website and follow the steps on the screen to enable it. Once Cloudflare has been activated on your website, head over to the SSL/TLS page in the dashboard of your Cloudflare account.
You will then need to switch to the ‘Edge Certificates’ tab and locate the HTTP Strict Transport Security (HSTS) section, and click on the ‘Enable HSTS’ option. After toggling the ‘Enable HSTS’ button on, a window will pop up with instructions to help you enable this feature on your site. Click on the ‘Next’ button to continue the process, and you’ll see the option to add HTTP security headers.
From here, you can enable HSTS on your site and also choose to apply HSTS to subdomains that are using HTTPS. Using this method will provide your site with basic protection using HTTP security headers, but the downside is that Cloudflare doesn’t currently let you add X-Frame-Options.
It’s worth noting that HSTS is enabled by default for servebolt.com and any other domains inside Cloudflare.
Adding HTTP Security Headers Using A WordPress Plugin
A third method of adding and configuring HTTP headers is to use a plugin. Although this is one of the easiest ways to add HTTP Security headers to your WordPress website, it’s usually a little less effective than manually configuring the headers.
You may have already read elsewhere that many security plugins include the option to add security headers. However, we recommend against using a security plugin. Read our article on WordPress Security Plugins to understand why and what the concerns are with using these.
This section will let you enable or disable various headers and set different parameters for them. The exact headers you can enable will vary depending on the plugin of your choice, but the common ones, such as X-XSS-Protection, X-Content-Type-Options, X-Frame-Options, and Strict-Transport-Security are covered by most plugins.
How to Check HTTP Security Headers On Your Website
After adding the HTTP security headers on your WordPress website, you’ll need to make sure they are configured correctly and working as expected. You can use one of the many free tools available on the Internet to perform a test. We recommend using either Security Headers or SSL Labs, both of which provide an easy way to test your configuration and verify that all security headers are working correctly.
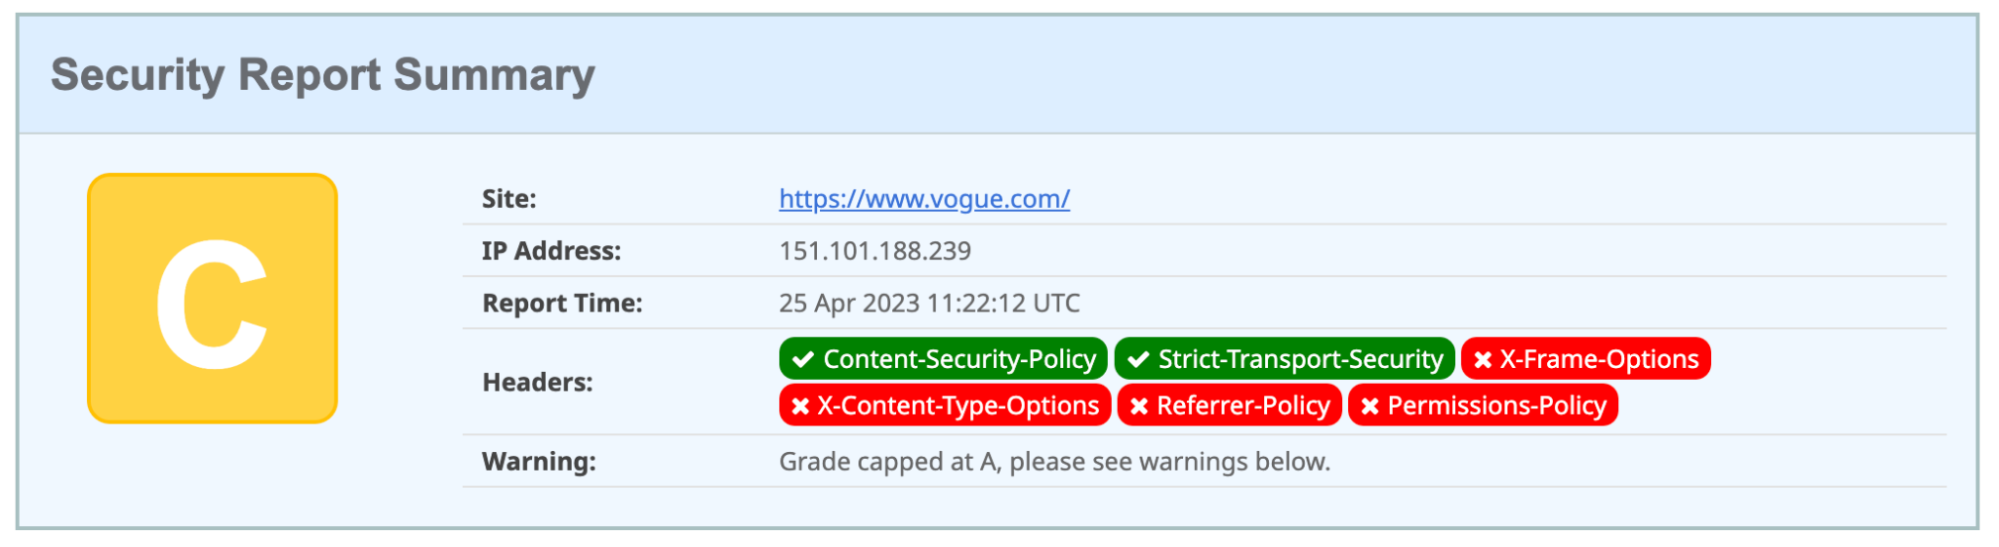
These tools will assess your website’s security headers and provide you with a detailed report. They also tell you which HTTP security headers your website is sending and which ones are not being sent. Your site will then be given a grade from A+ to F, along with an explanation of how that grade was determined.
For example, when testing Vogue’s website, we found that it is missing many important HTTP headers, so it earned only a C grade.
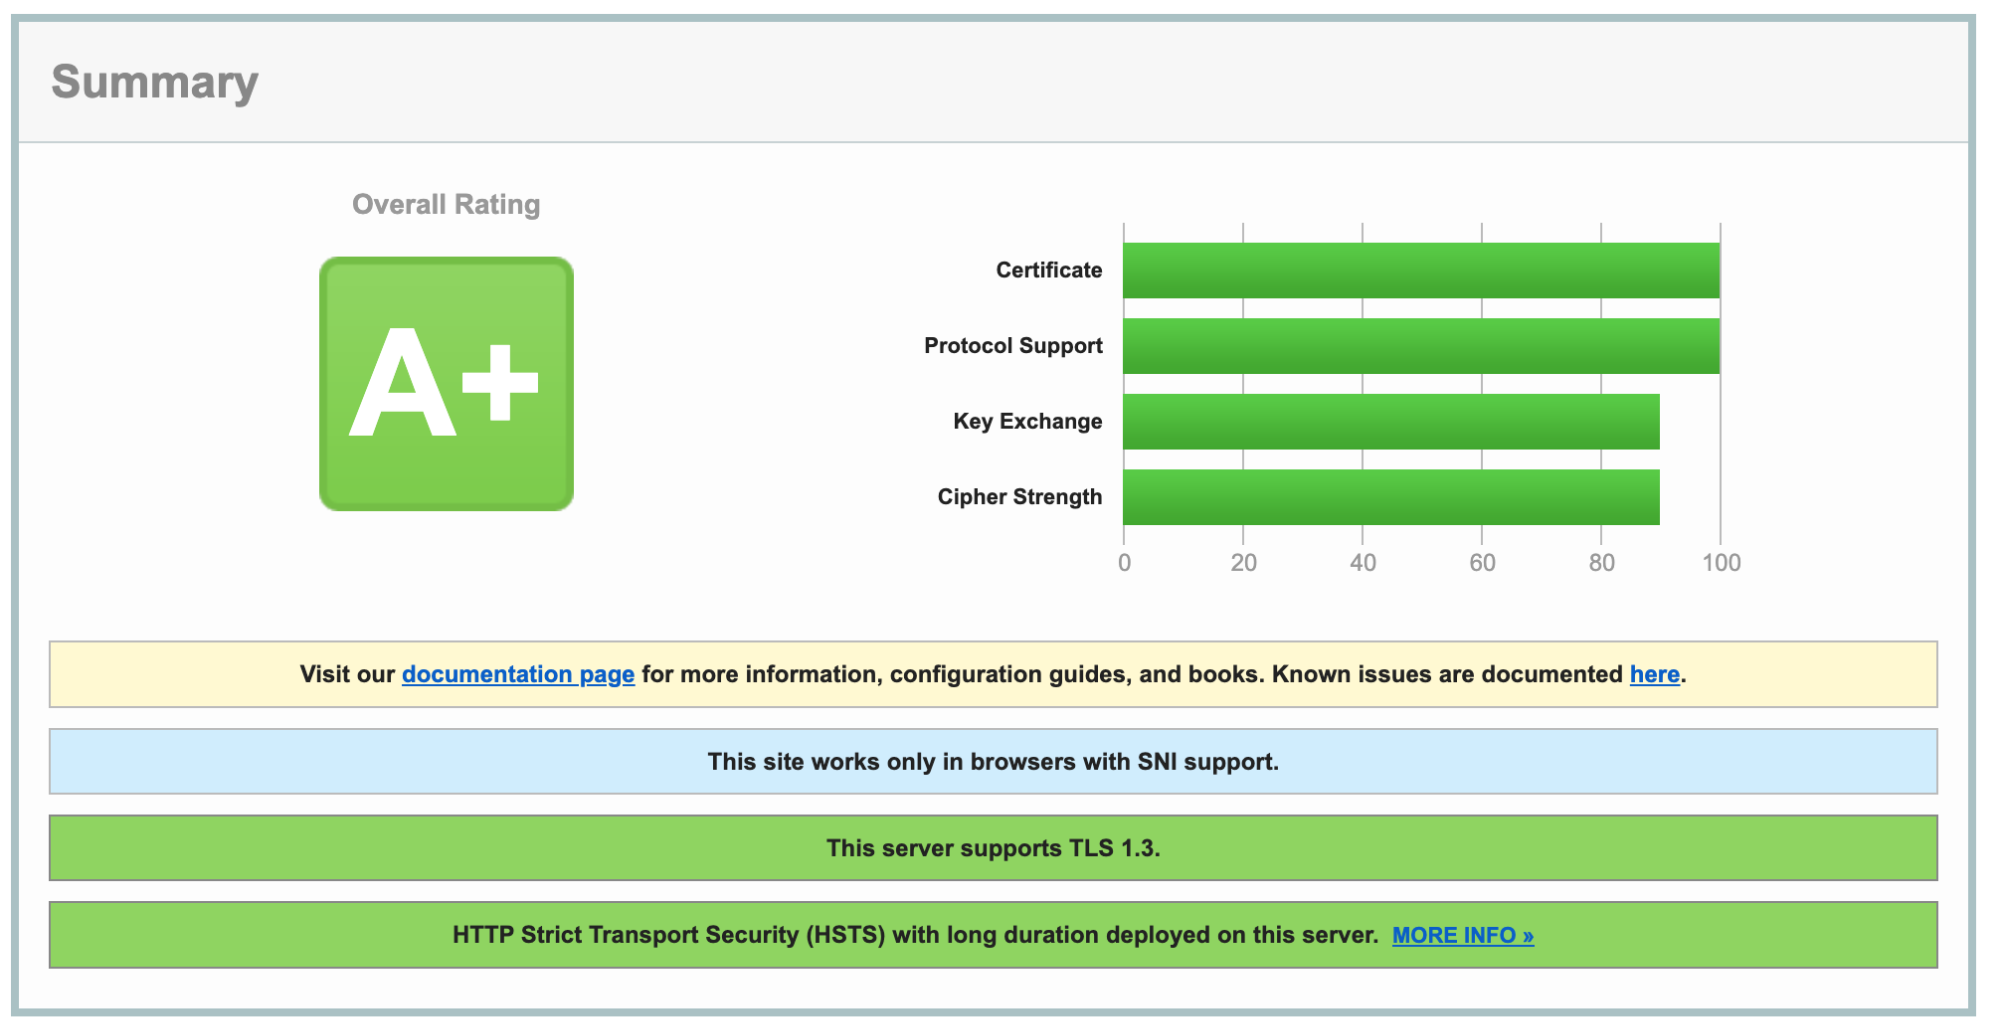
And, as you might well expect when testing our own website – it earns an A+ grade.
Conclusion
There’s no question that implementing HTTP headers is an essential step toward securing your website. After successfully adding HTTP headers to your website, here are a few additional steps you should also consider:
- Test for vulnerabilities: It’s important to test your site for common security vulnerabilities such as Cross-Site-Scripting (CSS) and Cross-Site-Request-Forgery (CSRF). For this purpose, you can use tools such as OWASP ZAP and Burp Suite.
- Monitor Changes: You need to regularly monitor the headers for any unexpected changes, as this usually indicates that there have been attempts to exploit a vulnerability.
- Update the headers: As new threats emerge, it’s important to stay up-to-date with the latest security practices and update your headers accordingly.
Interested in managed hosting that’s empirically faster? Try our approach to WordPress hosting – getting started is free, and benefits include:
- Scalability: In the real user workload tests, Servebolt delivered average response times of 65ms – 4.9x faster response times than the second best.
- The fastest global load times: Average page load times of 1.26 seconds put us at the top of the list of global WebPageTest results.
- The fastest computing speed: Servebolt servers provide previously unheard-of database speeds, processing 2.44 times more queries per second than the average and running PHP 2.6 times faster than the second-best!
- Perfect security and uptime: With 100% uptime on all monitors and an A+ rating on our SSL implementation, you can be assured your site is online and secure.
In short, by letting us take hosting off of your plate – you’ll make improving your site’s security, speed, and performance easier. Sign up for Servebolt to put us to the test.